Importing Photos from a Camera to the iMac
- Krissy Patel
- Feb 25, 2020
- 2 min read

Updated: Feb 26, 2020
1. After taking photos on the camera and returning to class, remove the SD camera from the back of the camera and insert it into the back of the iMac.
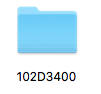
2. When the icon pops up on the desktop, click twice on the icon named D3400 to open the folder.
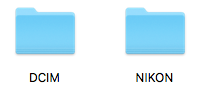
3. When the folder opens, there should be an additional folder within the previous folder that contains all of the photos taken on the camera. Drag this folder on to the desktop to transfer all of the photos onto the computer. Rename the folder (this could be a whole phrase or an acronym) with the copied files to indicate what project they correspond to (for example, if I were shooting depth-of-field, I would rename the folder "DOF").
4. To import the photos into Lightroom, you drag the folder containing the chosen photos onto the Lightroom icon.
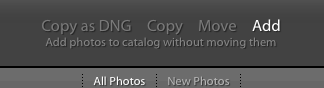
5. Once Lightroom opens, the photos should pop up on the screen. From there, you select "Add" from the top selection bar and then select "Import" from the bottom right corner of the screen.
6. After clicking "Import," the library module will appear. Scroll through the photos to see and choose which ones to edit.
7. To sort the good and bad pictures, press the "P" key to tag the photo and press the "U" key to untag a photo if you change your mind.
8. To sort the the pictures so that the photos you tagged are separated from the ones you didn’t tagged, click "View" at the very top of the computer screen in menu of the Library module. This should open up a tab with additional actions; click "Sort By" and then select "Pick."
9.Once you have sorted your pictures, switch from the Library module to the Develop module at the top right of the computer screen. Finally, edit the photos to your liking!


Comments